 Bye
How ByeDPI works: desync, explained with real packets
The documentation describes ByeDPI's methods in dense Russian shorthand. This guide slows them down, using the same 30-byte example request the docs themselves use — because once you can picture the sending order, every setting stops being magic.
Last updated: November 3, 2026 · Checked against the official ByeDPI documentation and GitHub repositories.
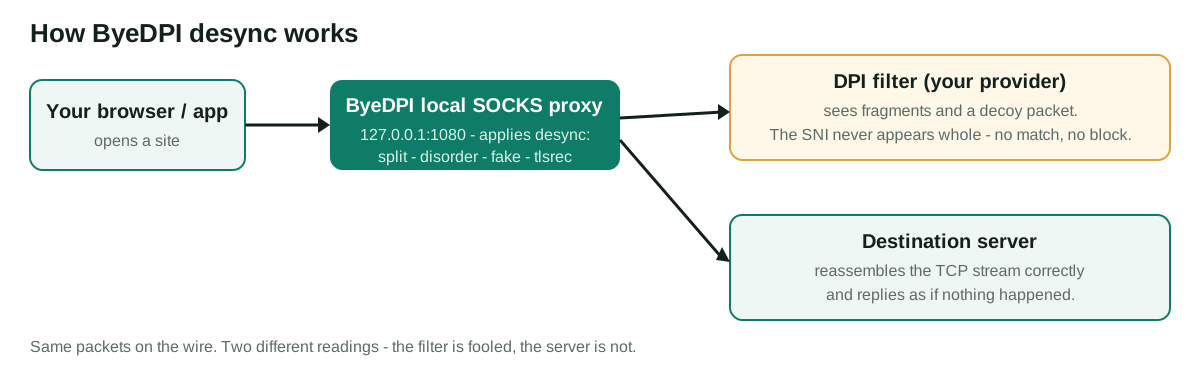
The setup: a proxy that lies to the middle, not to the server
ByeDPI is a local SOCKS proxy. Your browser hands it a connection; it opens the real connection to the server; and for the first request — normally only the first, controlled by the --round option — it intervenes. The intervention is called desync: the byte stream the Deep Packet Inspection (DPI) box reconstructs is made different from the byte stream the server reconstructs. Both are looking at the same wire. Tricks with ordering, TTL and out-of-band data make them disagree, and the disagreement is the whole product. Start with the simplest trick in the box: scissors.
Split: same bytes, smaller pieces
With --split 3 --split 7 on a 30-byte request, the sending order is 1–3, 3–7, 7–30. Nothing is changed, only chopped. A DPI that inspects each packet in isolation, or that fails to reassemble fragments before checking, now never sees the full site name in one place. The server, which properly reassembles the stream, sees the original request. Positions can be aimed: 1+s means one byte after the start of the SNI, which is why you will see that odd +s flag all over recommended commands — the split is being placed deliberately inside the name the filter wants to read.
Disorder: the second half goes first
--disorder 7 sends 7–30 first, then 1–7. The trick, on Linux, is that the first-sent piece is given a TTL of 1 in a way that means it effectively is not delivered onward; the operating system learns of the "loss" only after the next piece goes out, is forced to retransmit, and the order on the wire ends up scrambled for any observer who does not track the full TCP conversation as carefully as the endpoint does. Windows handles retransmission differently — it resends from the loss point — which is exactly why the docs pair disorder with a split on Windows and give the practical recommendation --split 1+s --disorder 3+s, while on Linux plain --disorder 1 is the suggested starting point. When a setting behaves differently on two operating systems, this is usually why.
Fake: a decoy the server never sees
--fake 7 sends bytes 1–7 as a fake first, then 7–30 genuine, then 1–7 genuine. The fake carries false data. For the bypass to work, the decoy must be processed by the DPI but not accepted by the server — otherwise you have simply corrupted your own request. Two mechanisms arrange that. A low TTL (--ttl, default 8) makes the fake expire after passing the filter but before reaching the server; choosing it is a Goldilocks problem, large enough to pass every DPI hop, small enough to die before the destination. On Linux, --md5sig instead marks the fake with a TCP MD5 signature option that most servers drop. Hence the documented Linux pairing --fake -1 --md5sig, and the Windows pairing --disorder 1 --fake -1, where full retransmission overwrites the fake even if it does arrive. Our settings guide turns these into an ordered testing ladder.
OOB and TLS records: the subtle two
TCP can carry one out-of-band byte, flagged URG. --oob 3 sends bytes 1–4 with that flag — the fourth byte is the out-of-band one and is effectively truncated for the receiving application — followed by the rest. Placed inside the SNI (--oob 3+s), it inserts a byte the filter trips over and the server discards. --tlsrec works one layer up: it cuts a single TLS ClientHello record into several records, inserting a new 5-byte record header mid-SNI (--tlsrec 3+s), so a filter parsing "one record, read the name" fails while a real TLS stack, which accepts multiple records, succeeds. The docs warn both can confuse middleboxes that implement TCP/TLS sloppily — which is why they recommend combining them with --auto.
Auto mode: only lie when it looks like a block
Desync applied everywhere can break fragile servers. --auto=torst changes the logic: connect normally, and apply the methods that follow the option only if a block-like event occurs — a timeout or reset after the first request (torst), a suspicious redirect, or a broken TLS answer. Combined with --hosts, which limits a group of options to a list of domains, and a cache that remembers which group worked for which site, this is what turns a bag of tricks into a set-and-forget tool. A complete worked command, straight from the documentation's own examples, looks like this:
ciadpi --disorder 1 --auto=torst --tlsrec 1+sRead it left to right: disorder the first byte by default; if a block is detected, also split the TLS record inside the SNI. That one line is, in our view, the most sensible desktop starting configuration in the entire documentation — and it is the first command we suggest in the installation guide. When it fails anyway, the failure is information: it tells you your provider's filter reassembles more carefully than average, and the fake-based methods move to the front of the queue. The troubleshooting guide explains how to read those failures instead of guessing.
Put the theory down and test something
Enough packets. the best ByeDPI settings ladder, step by step turns everything above into a sequence you can run this evening, and the ByeDPI troubleshooting guide by failure shape explains what the failures mean when they happen. The full shelf sits in the ByeDPI guides hub. If the program is not on your machine yet, the official ByeDPI download page is the only safe source and the step-by-step ByeDPI installation guide the walkthrough — after that, the ByeDPI support page and the ByeDPI FAQ handle whatever is left.
References and sources
Everything factual in this guide traces back to a short list of primary sources. If you read nothing else off-site, read these.
- hufrea/byedpi on GitHub — the ByeDPI core: source, options documentation and releases.
- RFC 1928 — SOCKS Protocol Version 5 — the specification of the SOCKS5 protocol ByeDPI's proxy speaks.
- RFC 8446 — The Transport Layer Security (TLS) Protocol Version 1.3 — defines the ClientHello and the SNI extension this site keeps talking about.